Launching a startup is exciting — but building a full-featured product before validating your idea can be risky and expensive. That’s where an MVP (Minimum Viable Product) comes in.
An MVP helps you test your idea with real users, validate market demand, and gather feedback — all while minimizing time and development costs.
1. What Is an MVP?
A Minimum Viable Product is the simplest version of your product that delivers core value to users while allowing you to collect feedback for future improvements.
An MVP is not a “cheap” or “incomplete” product — it is a focused product built with one main goal: validation.
2. Why Startups Should Build an MVP
- Reduce Development Costs – Avoid building unnecessary features.
- Validate Market Demand – Test if users actually want your solution.
- Faster Time-to-Market – Launch quickly and iterate.
- Attract Investors – Show traction and user engagement.
- Gather Real User Feedback – Improve based on real data, not assumptions.
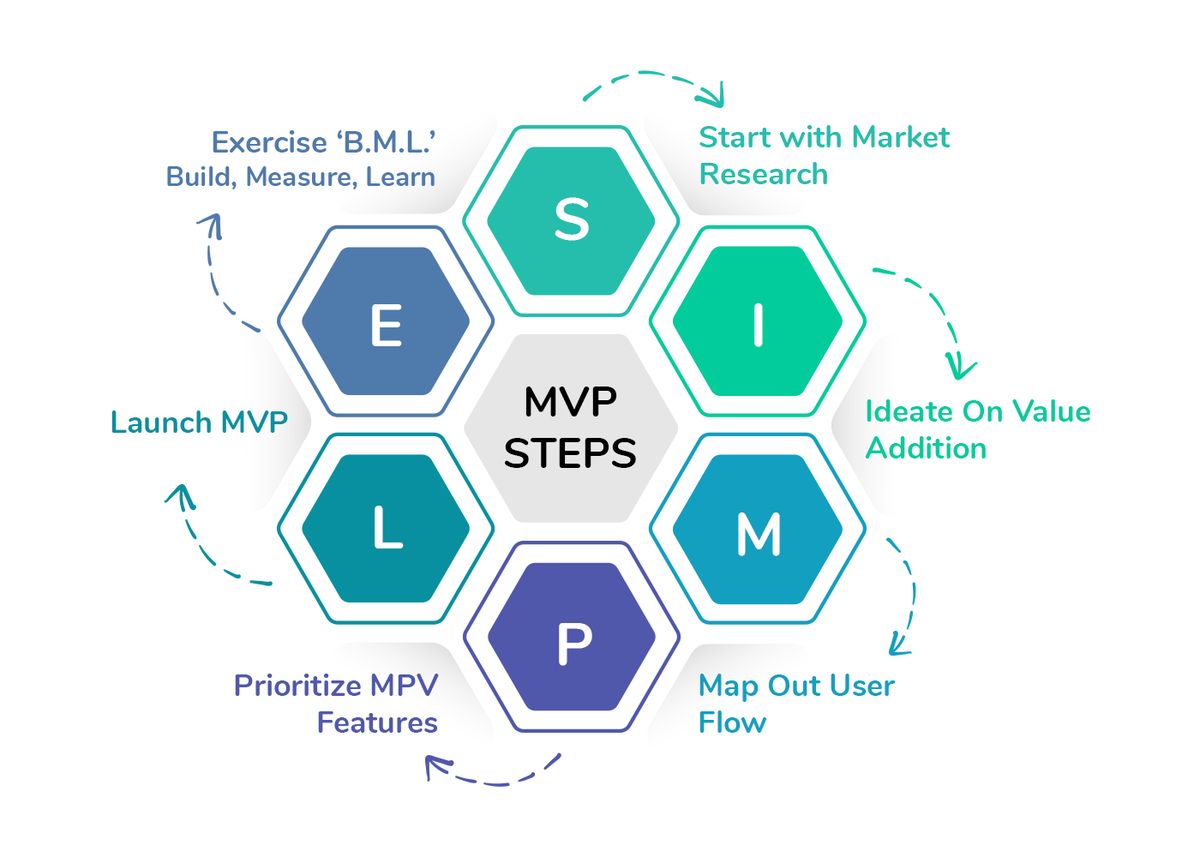
3. Step-by-Step Guide to Building an MVP
Step 1: Define the Problem Clearly
Every successful startup solves a clear problem. Before writing any code, answer:
- Who is your target audience?
- What specific problem are you solving?
- How are users currently solving it?
- Why is your solution better?
Create a simple problem statement that defines your value proposition.
Step 2: Conduct Market Research
- Analyze competitors.
- Identify market gaps.
- Interview potential users.
- Validate willingness to pay.
Use surveys, landing pages, or waitlists to measure early interest.
Step 3: Define Core Features (Keep It Lean)
Your MVP should include only the essential features required to solve the primary problem.
Use the MoSCoW method:
- Must-have – Core functionality
- Should-have – Important but not critical
- Could-have – Nice-to-have features
- Won’t-have – Postpone for later versions
Focus only on the “Must-have” features for MVP.
Step 4: Choose the Right Technology Stack
Select technologies that allow rapid development and scalability.
- Use frameworks that speed up development.
- Consider cloud-based infrastructure.
- Use third-party APIs instead of building everything from scratch.
- Ensure your architecture can scale later.
Speed matters more than perfection at this stage.
Step 5: Build, Test, and Launch Quickly
- Adopt Agile development.
- Release early versions internally.
- Conduct usability testing.
- Fix major bugs before launch.
Your goal is not perfection — it’s validation.
Step 6: Gather Feedback & Measure Metrics
After launch, track meaningful KPIs:
- User acquisition rate
- Activation rate
- Retention rate
- Customer feedback
- Conversion rate
Use analytics tools and direct user interviews to understand behavior.
4. Different Types of MVPs
1. Landing Page MVP
A simple page explaining your product to measure interest and sign-ups.
2. Concierge MVP
Manually deliver the service before automating it.
3. Wizard of Oz MVP
Simulate automation while manually operating behind the scenes.
4. Single-Feature MVP
Focus on delivering one powerful feature exceptionally well.
5. Common Mistakes to Avoid
- Adding too many features.
- Ignoring user feedback.
- Over-engineering architecture early.
- Skipping market validation.
- Waiting too long to launch.
6. When to Move Beyond MVP
You should scale your product when:
- Users are consistently engaging.
- You have validated product-market fit.
- Revenue or strong traction is evident.
- Feedback patterns indicate demand for expansion.
7. From MVP to Scalable Product
- Refactor technical debt.
- Improve UI/UX design.
- Strengthen security.
- Optimize performance.
- Expand feature set strategically.
Final Thoughts
Building an MVP is about learning — not perfection. The faster you validate your assumptions, the faster you can pivot, improve, or scale confidently.
Start small, solve one real problem exceptionally well, listen to your users, and iterate quickly. Many successful startups began with a simple MVP — what matters is how you evolve after launch.